Anchor a 3D Model to a Hand in VisionOS 2 using SpatialTrackingSession
Like perhaps, the Infinity Gauntlet ✨
Adding a hand tracked 3d model to a VisionOS 2 project can be a fun way to add character to an experience. And possibly fulfill a dream in the process! In this tutorial, we will go from blank template to full gauntlet-on-hand.

Some important notes before we get started:
- Access to the hand tracking data does not currently work in the Xcode VisionOS simulator, so to be able to test this code, you will need access to a physical Apple Vision Pro headset.
- Access to the hand tracking data currently only works in apps that are in the “full space” where all other apps go away, so the user will not be able to access other apps while they are using the “full space” part of your app. More on this topic can be found here: https://developer.apple.com/design/human-interface-guidelines/immersive-experiences
We’ll start with the basic VisionOS template:


Info.plist Key For NSHandsTrackingUsageDescription
Custom hand tracking is only available in shared space, and requires access to protected user data, so we’ll need to request permission from the user to access this data. In the .plist file, add the key NSHandsTrackingUsageDescription with a description of what we’ll be using the data for.


Importing 3D Model Into Reality Composer Pro Using Reality Converter
For our project, we’re going to add a 3D model of Thanos’ gauntlet to the user’s hand. Which means we need a 3D model of Thanos’ gauntlet. I am not a 3D modeler, but there is a rich community of artists sharing 3D models online that are available for download. I’m using this 3D model that I found, but feel free to use whatever model you would like. This specific model is free for Personal use but would require a license for commercial use, so please be aware and follow correct licensing rights when you search for 3D models for use in your projects.
Unless you find a .usdz file, you’ll probably need to convert the 3D model to be ready for use in your project. Luckily, Apple makes this easy to do with the Reality Converter app, which can be downloaded from Apple here: https://developer.apple.com/augmented-reality/tools/.

I downloaded the .obj file of the gauntlet, which you can see comes with a variety of image files that will work together to create the textured material on the model.

As a quick description, each of these image files correlate to a specific property of a 3D model texture, and will be combined together to create the realistic looking materials on our model.
Open up Reality Converter, and drag the .obj file into the app


You’ll notice that the 3D model does not have the correct texturing, which is no concern as we’ll assemble that easily with those assorted image files that came with the model. In the top right corner, you’ll see a drop down menu that will let you cycle through the different materials that the artist assigned to the model:

These represent the different materials that the artist had created and assigned to different parts of the model (in our case, the metallic gauntlet along with each of the 6 gem stones). While these are not labeled exactly in the most helpful way, there’s an easy way to figure out which material is assigned to what part of the model by using the “Base Color” property on the material, which will be used with the “albedo” images (which will be providing the main color in our materials).


If you click on the Base Color button on a texture, and assign an albedo image to the Base Color property, you’ll quickly be able to see what that material is related to — for example, in this particular model, “object_0” material corresponds to the metallic part of the gauntlet:

If the texture images are labeled correctly, deduction can be used to get the right base color attached to the right material — in my case, the file labeled “RGB_7c3649631a544db39ce4cacda35beef4_InfinityGauntlet_M_albedo”.

Repeat with the different files related to that material, such as Emissive, Metallic, Roughness, Normal, Occlusion (sometimes referred to as Ambient Occlusion or AO), etc, and you should have something that looks like this:

Repeat with all the materials in the drop down menu, and you’ll have a fully textured gauntlet! After all the materials have been created, use the export button in the top right or command-E to export the model for use in our project:


This should give you a fully textured .usdz model:

Back in our Xcode project, it’s time to import the model into Reality Composer Pro. In the sidebar, navigate into “Packages”, then “RealityKitContent” and finally the “Package” reality composer file:

Use the “Open in Reality Composer Pro” button to open the project’s package file in the Reality Composer Pro app:


First, import the .usdz model by either drag and dropping the file into the “Project Browser” window on the bottom center, or by clicking on the import button:


We will be making a new scene for our model with the box-shaped button, which will have the .usda file type:


With our new scene, drag and drop the 3d model into the left-side panel, which will place the model in our scene:

It’s important to save the scene after we make changes with either File → Save or command-S, which is required for the Xcode project to be able to recognize the updates. Finally, rename the scene to what you would like to use in the Xcode project when referencing it:

Implementing in Xcode
We will be using the new SpatialTrackingSession object that Apple introduced in VisionOS 2 to incorporate the spatial tracking of the user’s hand. More information on this feature can be found in Apple’s documentation:
We’re going to adapt the immersive scene from the template code to be used to launch our gauntlet experience. In Xcode, go to the ImmersiveView.swift file:

Add the SpatialTrackingSession as a State variable to the ImmersiveView:
@State private var session: SpatialTrackingSession?Next, in the RealityView, we’ll set up the session with hand tracking specifically:
let session = SpatialTrackingSession()
let configuration = SpatialTrackingSession.Configuration(tracking: [.hand])
_ = await session.run(configuration)
self.session = session
VisionOS provides many potential hand anchor points for developers to use, basically at every joint in a person’s hand. For our experience, we want to anchor a glove-shaped item on the user’s left hand that follows the entire hand (not just a finger or joint), so we’ll add an AnchorEntity that is positioned on the user’s left hand, specifically anchored to the user’s palm:
let handAnchor = AnchorEntity(.hand(.left, location: .palm), trackingMode: .continuous)Now we’ll add the Reality Composer Pro scene with our gauntlet to the project, modifying the existing Immersive scene code to load the scene using the name we gave it in Reality Composer Pro:
if let gauntletEntity = try? await Entity(named: "Gauntlet", in: realityKitContentBundle) {...}However, instead of just adding the scene to the project, we want to child the Gauntlet specifically to the handAnchor (otherwise your gauntlet will end up on the ground):
handAnchor.addChild(gauntletEntity)To close out the setup, add the handAnchor to the RealityView content
content.add(handAnchor)All together, the code should look like this so far:
import SwiftUI
import RealityKit
import RealityKitContent

struct ImmersiveView: View {

    @State private var session: SpatialTrackingSession?

    var body: some View {
        RealityView { content in

            //Begin a spatial tracking session to understand the location of the user's hands.

            let session = SpatialTrackingSession()
            let configuration = SpatialTrackingSession.Configuration(tracking: [.hand])
            _ = await session.run(configuration)
            self.session = session

            //Setup an anchor at the user's left palm.
            let handAnchor = AnchorEntity(.hand(.left, location: .palm), trackingMode: .continuous)

            //Add the Gauntlet scene that was set up in Reality Composer Pro.
            if let gauntletEntity = try? await Entity(named: "Gauntlet", in: realityKitContentBundle) {

                //Child the gauntlet scene to the handAnchor.
                handAnchor.addChild(gauntletEntity)

                // Add the handAnchor to the RealityView scene.
                content.add(handAnchor)

            }
        }
    }
}
If you run this on your headset and tap the button to enter the immersive space, you’ll see that we’re ALMOST there:

With just a couple quick adjustments, we’ll be all set!
Gauntlet Rotation and Position
We can easily adjust the rotation of the Gauntlet in Reality Composer Pro.
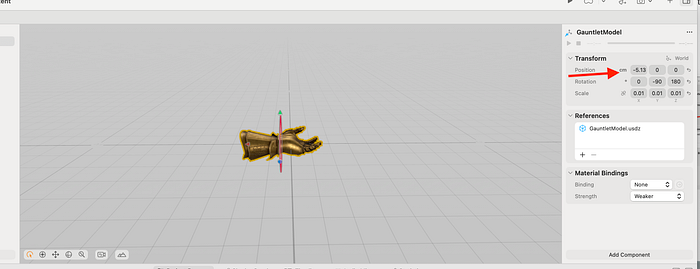
In the scene, select the gauntlet model and adjust the rotation of Y to be -90 and Z to be 180, and save to update the Xcode file:

Building this code reveals that the gauntlet is not facing the right orientation, but is still not aligned:

This is because we’re anchoring to the user’s palm, which is centering the model on the palm which doesn’t quite work for our needs. Luckily this is an easy update by changing the gauntlet’s position — depending on your hand size, your adjustments might vary but this number was fairly close for me:
Here’s the result:

Upper Limb Visibility
You’ll notice that there’s still a ghost image of the user’s hand visible. This can be changed if desired with one modifer on our RealityView file: .upperLimbVisibility(.hidden)
import SwiftUI
import RealityKit
import RealityKitContent

struct ImmersiveView: View {

    @State private var session: SpatialTrackingSession?

    var body: some View {
        RealityView { content in

            //Begin a spatial tracking session to understand the location of the user's hands.

            let session = SpatialTrackingSession()
            let configuration = SpatialTrackingSession.Configuration(tracking: [.hand])
            _ = await session.run(configuration)
            self.session = session

            //Setup an anchor at the user's left palm.
            let handAnchor = AnchorEntity(.hand(.left, location: .palm), trackingMode: .continuous)

            //Add the Gauntlet scene that was set up in Reality Composer Pro.
            if let gauntletEntity = try? await Entity(named: "Gauntlet", in: realityKitContentBundle) {

                //Child the gauntlet scene to the handAnchor.
                handAnchor.addChild(gauntletEntity)

                // Add the handAnchor to the RealityView scene.
                content.add(handAnchor)

            }
        }
        .upperLimbVisibility(.hidden)
    }
}
The Final Result:

Hope you enjoyed this tutorial and are able to take some of the learnings into your own projects! The Github repository for the finished product is here: