Tutorial: How To Switch Between Front and Rear Cameras in RealityKit using a SwiftUI Button
iOS AR Development Quick Guide
If you are building an Augmented Reality experience for iOS, you might want to offer your users the ability to switch between the front facing (aka “Selfie” or “Face Side”) camera and rear facing (aka “World Side”) camera. Here is a basic tutorial for how to add this functionality to your app.
Basic Setup
First, let’s start from the Augmented Reality App template in Xcode (I’m using Xcode 14.0):

For this tutorial, I am using SwiftUI as the interface, Swift as the Language, and RealityKit as the Content Technology:

You should see a basic application set up like this:

Before we can switch between the cameras, however, we need a button.
Adding the Button
Right now, our ContentView looks like this:
I’m going to add a basic button where we can run the logic to switch cameras. I’ve placed the ARViewContainer in a ZStack with a button:

Separate Logic From SwiftUI Visuals (Model View View Model)
To make it really easy to control the logic of the ARView, I’m going to separate it into it’s own Data Model with a connecting View Model.
ARModel
A new ARModel struct is where we will move the creation of the ARView:
As you can see, we really only need the above for the creation of a basic ARView scene.
ARViewModel
A new ARViewModel class is where we will make a variable “model” that is an instance of our ARModel struct.
The model variable is of the @Published type, and the class ARViewModel will conform to the ObservableObject framework so that our ARModel instance can be interacted with elsewhere in our app and have the updates take place in the ARModel. As these frameworks are outside the scope of this tutorial, please see the below resources if you have any questions:
- More documentation on @Published: Apple Documentation, Hacking With Swift
- More documentation on ObservableObject: Apple Documentation, Hacking With Swift
Finally, we will make slight tweaks to our Contect View and ARViewContainer to take advantage of the new ViewModel:
ARViewController
ContentView
Now we have everything in place. If you run the app now, you should see that it still works, but that the button doesn’t currently do anything.

What decides which camera is used in RealityKit?
Two of the main configurations that could be used when setting up an ARView are:
- ARWorldTrackingConfiguration() (Apple Documentation)
- ARFaceTrackingConfiguration() (ARFaceTrackingConfiguration)
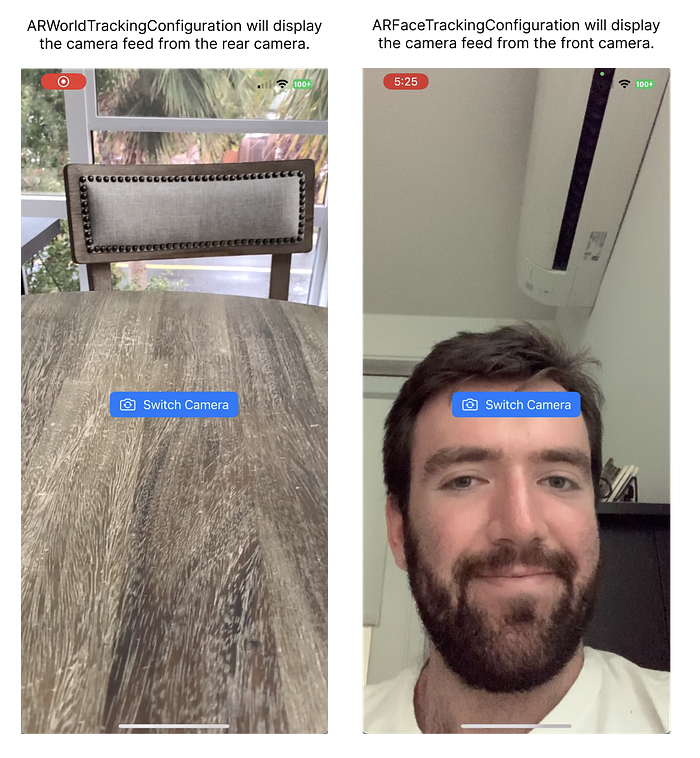
Each of these configurations provides specific information to our app to best set up the background foundation for our app. ARWorldTrackingConfiguration tells your app (among other things) to display the rear camera feed, while ARFaceTrackingConfiguration tells your app to diplay the front camera feed.
ARWorldTrackingConfiguration is the default that’s applied when an ARView is created, but we can explicitly set this in our app.
Logic to Switch Cameras
In order to switch between cameras, we are going to add a function to our ARModel that:
- Gets the current ARView.Session.Configuration and sets it as a “newConfig” variable
- Checks to see if the current ARView.Session.Configuration is ARWorldTrackingConfiguration or ARFaceTrackingConfiguration
- Sets the “newConfig” variable to the opposite configuration
- Runs the new ARView.Session.Configuration using the ARView.Session.Run() function
Note that we will also need to import ARKit into the ARModel for this to work:
Update to ARModel
Make the below updates to ARModel:
import ARKitfunc switchCamera() {
        guard var newConfig = arView.session.configuration else {
            fatalError("Unexpectedly failed to get the configuration.")
        }
        switch newConfig {
        case is ARWorldTrackingConfiguration:
            newConfig = ARFaceTrackingConfiguration()
        case is ARFaceTrackingConfiguration:
            newConfig = ARWorldTrackingConfiguration()

        default:
            // In this tutorial, we are only working with ARWorldTrackingConfiguration and ARFaceTrackingConfiguration
            newConfig = ARWorldTrackingConfiguration()
        }

        arView.session.run(newConfig)
    }
Your ARModel file should now look like this:
We then need to add a function to our ARViewModel that connects to the ARModel function we just created:
Update to ARViewModel
Make the below update to the ARViewModel:
func switchCamera() {
        model.switchCamera()
    }
Your updated ARViewModel file should look like this:
Finally, we need to connect this to our button in ContentView:
Update to Button in ContentView
Add the below function to the action part of the Button:
arViewModel.switchCamera()Your updated ContentView should now look like this:
Then hit run, and you should be able to tap the “Switch Camera” button to switch between the front camera and the rear camera:

Ta Da!
Now you have a button that switches between the ARWorldTrackingConfiguration and the ARFaceTrackingConfiguration to switch what camera your ARView is using!
For more context directly on this topic from Apple’s Documentation, look here:
Here’s the full repository for this tutorial on GitHub for easy access: